-
This article contains the following contents:
Overview of Microsoft Bookings
Microsoft Bookings makes scheduling and managing appointments a breeze. Bookings include a web-based booking calendar and integrates with Outlook to optimize your staff’s calendar and give your customers the flexibility to book a time that works best for them. Automated notification emails reduce no-shows and enhance customer satisfaction, and organizations save time with a reduction in repetitive scheduling tasks. With built-in flexibility and ability to customize, Bookings can be designed to fit the situation and needs of many different parts of an organization.
Bookings has three primary components:
A booking page where your customers and clients can schedule appointments with the staff member who should provide the service or run the appointment. This web-based scheduling page can be shared via a direct link, your Facebook page, and even through link embedding within your website. A web app that contains a set of web-based, business-facing pages where Bookings calendar owners and administrators within an organization can define appointment types and details, manage staff schedules and availability, set business hours, and customize how appointments are scheduled. These pages allow for versatility and the ability to customize a Bookings calendar to fit the diverse needs of the person or organization. A business-facing mobile app where Bookings calendar owners and administrators can see all of their appointments, access customer lists and contact information, and make manual bookings on the go.
How Microsoft Bookings works
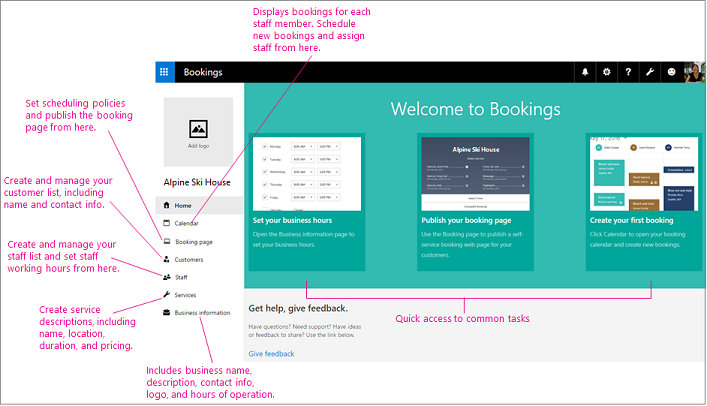
As with all of the Microsoft 365 apps, Bookings is a tile in the app launcher. Click the tile to launch the app or select the app launcher, and then select Bookings. The first time you open the app, you'll see the home page, which includes tabs on the left to navigate between pages and several prominent tiles that guide you through the setup and introduce new features.
Publish your business calendar online with Microsoft Bookings
-
Step 1: Enter your business information: https://support.microsoft.com/en-us/office/enter-your-business-information-828a17db-956a-401e-bb62-d153b6dffd53
Step 2: Set your scheduling policies: https://support.microsoft.com/en-us/office/set-your-scheduling-policies-4b2c84ec-64d3-4027-af4c-40f69e7b37c9
-
Step 3: Define your service offerings: https://support.microsoft.com/en-us/office/define-your-service-offerings-in-microsoft-bookings-4a1c391e-524f-48e0-bef8-185df3a9634b
-
Step 4: Create your staff list: https://support.microsoft.com/en-us/office/create-your-staff-list-298c529b-407b-4a2b-b2c5-6e77a9d1f07f
-
Step 5: Set employee working hours: https://support.microsoft.com/en-us/office/set-employee-working-hours-0968717e-b61f-4b06-987c-6c1464541782
-
Step 6: Schedule business closures, time off, and vacation time: https://support.microsoft.com/en-us/office/schedule-business-closures-time-off-and-vacation-time-e3c0a4ee-e3d8-4fbe-bd8f-16d1c712d1f4
-
Step 7: Publish or unpublish your booking page: https://support.microsoft.com/en-us/office/publish-or-unpublish-your-booking-page-4fb0235c-01e7-4447-bf91-0915c21b84ad
-
Step 8: Create and staff your bookings: https://support.microsoft.com/en-us/office/create-and-staff-your-bookings-03a9acc9-f29c-456b-9fb2-0f49474b2708