*Please note this article is currently under review.
Frequently Asked Questions on Web Conferencing Tools
Q: What web conferencing tools are supported by Eastern?
A: Blackboard Collaborate and MS Teams
Q: What are the minimum hardware equipment requirements?
A: The minimum requirements for web conferencing tools such as Blackboard collaborate, MS Teams, and Webex is a mobile device. Students/faculty can access web conferencing tools using downloaded applications and show their video feed if needed. However, if the user needs to share their screen, a computer whether desktop or laptop is required.
Q: What if I am having computer audio issues, but need to share my screen?
A: This is still possible. Use your computer to share your screen, and your mobile device to call in. See the question below to learn how to use the dial-in numbers.
Q: I am accessing the conferencing tools, but no one can hear me?
A: If you are experiencing issues with audio, there are calling numbers available for all Eastern supported web conferencing tools.
- Blackboard Collaborate:
- From in the session: If you have joined a session on a browser and want to use your phone for audio, open the Session menu and select Use your phone for audio. Select the number listed and enter the temporary personal identification number (PIN). With this personal PIN, you appear as yourself in the session. This PIN is associated with your personal account. Don't share it with anyone.
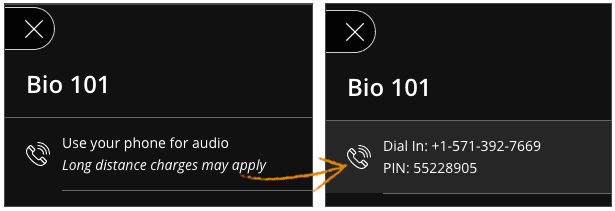
- From the list of sessions: Select the name of the session you want to call into. Select the Anonymous dial-in information from the menu. Your device calls into the session. You appear as an anonymous caller to other attendees in the session.
.png)
- MS Teams:
- Desktop: In Teams, you can call in to a meeting by going to the Calendar Meetings button on the left side of the app, selecting the meeting you want to join, and dialing the phone number provided in the meeting details.
- Mobile: Instead of joining online, you can call in to a meeting with your phone. To get the phone number, tap the meeting or meeting notice, and select See details. You'll see a phone number that you can use to dial in.
If you’re not a member of Teams, you can still join a Teams meeting from an invitation you received in Outlook or another email application. Use the phone number provided to dial in to the meeting.
- Webex:
- Check your Email Invitation: Under the section to join the audio conference, look for a link to access the Global call-in numbers. Click the link to view the global call-in numbers.
- To get the global call-in numbers when you join your meeting: An Audio and Video Connection prompt will appear when you join your meeting. Select I Will Call In in the drop-down. The 'Audio Connection' dialog box appears. Click on the link for All global call-in numbers.
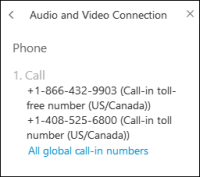
The 'global call-in numbers' will appear in a pop-up window.
Q: How do I set up my audio and video?
A: You must complete audio and video set up at least once before you can use them by giving the browser permission to use audio and video to participate in a session. This is necessary so that you are seen and heard. Note: Some browsers need access to your microphone to play audio, even if you don't plan to speak. To hear others in the session, give the browser permission to access the microphone.
Follow these steps to run the audio and video set up:
- Blackboard Collaborate:
- Open My Settings. Select your profile pictures and select your name. Or open the Collaborate panel and select My Settings.
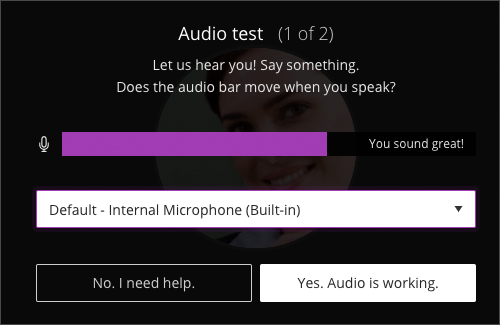
- Select Set Up your Camera and Microphone.
- Choose the microphone you want to use. Collaborate tells you that you sound great when it is receiving your audio. Select Yes, it's working to proceed.
- Choose the camera you want to use. Collaborate tells you that you look great when it is receiving your video. Select Yes, it's working to proceed.
After you are set up, select the microphone and video camera icons any time during a meeting to turn them on or off. With your keyboard, press Alt + M to turn your microphone on and off. Press Alt + C to turn your camera on and off.
Collaborate remembers your choice. You don't have to do this again from the same device or browser unless you clear your cache.
- MS Teams:
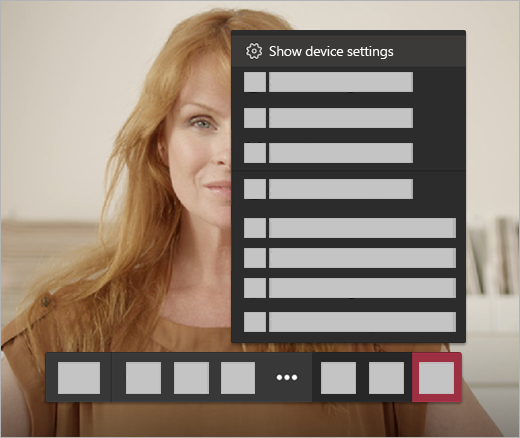
- To change your speaker, microphone, or camera settings when you’re on a call or in a meeting, select More options
 .
. - Show device settings
 in your meeting controls.
 - Then, select the speaker, microphone, and camera options you want.
- Webex:
1. From the Select Audio Connection drop-down list, select your audio connection.
Audio and Video Connection.
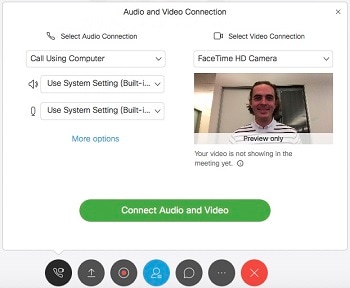
2. From the Select Video Connection drop-down list, select your video connection.

3. Select Connect Audio, Start My Video, or Connect Audio and Video.
If you selected Call My Video System for the audio connection, it may take 5–10 seconds from the time you answer the call until the connection is established. For the 5–10 seconds, the call is put on hold.
Your audio and video selections are saved for your next meeting on this site.
Q: How do I troubleshoot MS Teams microphone issues on a Mac?
A: If you're using a Mac and you're having trouble getting your microphone to work, you might need to change one of your privacy settings.
Here's how to check:
-
Open System Preferences
-
Select Security & Privacy
-
Under Privacy, choose Microphone (Check off Accessibility as well and whatever else it might be asking for access to) on the left
-
Make sure Microsoft Teams is selected
[missing screenshot]
Note: After installing and allowing access, you usually need to reboot for the settings to take effect.
Q: MAC users are having some difficulty sharing their screen on Webex.
A: The issue can depend on how their accessing Webex. If they’re using the Webex web app version, it may be related to their security settings and/or the browser they’re using. For users who have downloaded the desktop app, there aren’t any known issues with screen sharing.
The following guide can be shared with students to assist them on how to make the proper adjustments: https://help.webex.com/en-us/n0rqd8g/Cisco-Webex-Web-App-Known-Issues-and-Limitations#:~:text=With%20macOS%20Catalina%20(10.15)%2C,to%20the%20Screen%20Recording%20permission
Below are some key points in the guide that prevent a user from sharing their screen.
Content sharing is currently only supported in Chrome and Firefox. Note: To enable content sharing in Chrome version 71 or earlier, you must install the Cisco Webex and Cisco Webex Teams Content Sharing extension. This is not required in Chrome version 72 or later.
With macOS Catalina (10.15), Apple introduced new security and privacy features for Mac devices. To share your screen in the Webex Meetings web app, you have to ensure that your browser is granted access to the Screen Recording permission (the guide includes the steps to grant access).
Q: How can I present with everyone being able to hear and see my screen?
A: You must use a computer whether desktop or laptop to be able to share your screen.