|
Article ID: 619
Last updated: 4 Apr, 2024
Students Note: Not every class uses Collaborate. If you don't see it in your class, confirm with your instructor that they have made it available and expect you to use it.
Blackboard Collaborate is a simple, convenient, and reliable web conferencing solution built into Blackboard. Faculty can add files, share content, and use a virtual whiteboard to interact. It opens right in the browser, so you don’t have to install any software to join a session. The videos and information below give an overview of the general interface and features. More details about other features can be found in Blackboard's Class Collaborate Ultra documentation. Faculty who want to use Collaborate in their course first need to create a Tool Link as describe in Article 618: Creating a Course Tool Link. Once created, the link will appear on your course menu for students and faculty. Click on the link to access the Collaborate tool. By default a Course Room is created. This room can be for all sessions or faculty can schedule individual sessions. Click on the icon and then Join Course Room to access the room. Note: If faculty engage the Guest participant feature, they can copy a link to give to non enrolled members. The link is accessible without an eastern account, so please be cautious when sharing it. The feature can be turned off once the guest no longer needs access.
The following video gives an overview of the basic collaborate interface.
Having a social presence can be critical to a successful online learning experience. Something as simple as adding a profile image can make learners more comfortable with participating online. Collaborate remembers your choice. You don't have to do this again from the same device or browser, unless you clear your cache. The following video shows how to add an image to your profile. The following video explains two ways you can share your PowerPoint presentations.
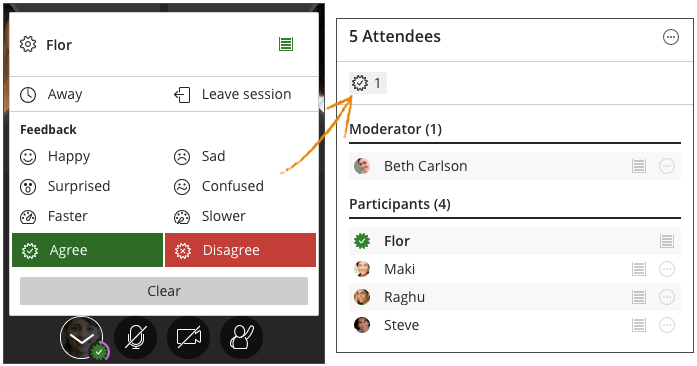
Breakout rooms are created from within the room, either automatically or manually. The video below shows how faculty can use breakout rooms for groups . Users and change their status and give feedback using the buttons at the bottom of the room. Change your status to away or let others know how you feel about something said or shared in the session. Feedback appears with an attendee's profile picture on the main stage, in the Attendees panel, and in Chat. After 30 seconds the feedback disappears. The Away status stays until you return and select I'm back! A summary of the feedback selected appears under the panel heading. It shows the current feedback with a count of attendees using it. You can sort the attendees by feedback in the Attendees panel. For example, if you want to know who is happy about what was said, select Happy under the Attendees heading. Only those who are happy appear.
This article was:
Article ID: 619
Last updated: 4 Apr, 2024
Revision: 9
Access:
Public
Views: 1937
Also listed in
|
.png)

