|
...
|
Article ID: 642
Last updated: 29 Aug, 2025
Due to the increased use of web conferencing tools and the possibility of disruptive participants, it is important to know how meeting organizers can take precautions and respond if such an event occurs. The information below gives an overview of the subject and the steps that can be taken to remedy it with each of our Web Conferencing tools. First we recommend reviewing whether the web conferencing tool you've chosen is the best for the particular audience. MS Teams is best for an audience of Eastern account holders, and Blackboard Collaborate is best for classes. Please refer to Article 621: Choosing a Web Conferencing Tool for more details All meetings should be password protected, and the distribution of that password should be carefully controlled. The offending party is often called a hacker and disrupts the chat or audio/visual aspect of the meeting. However, most times they are not hackers, they are simply unwanted participants who are using the tool as any other participant and have been given the meeting access information in some fashion. This can occur if your meeting link is public or if valid participants shared the information with others. The best method of prevention is to regulate access by restricting your distribution of the meeting link and/or password to those who RSVP or register via some other method. If that's not possible or desirable, a publicly accessible event should be one way, with chat and mics disabled for the duration of the presentation or else monitored by the host/organizer while some one else presents. Using the steps below will allow a host to mitigate disruption. MS TeamsMS Teams cannot mute all participants and prevent them from unmuting, nor can it shut down the chat. The tool isn't designed for public events, but rather meetings between colleagues. MS Teams has a setting that requires participants to have an Eastern account, and offenders can be held accountable. There is a method for inviting a guest participant, but not for distribution to mass audiences. If you remove a participant, they will be able to rejoin. Creating your meeting by using the Lobby will effectively prevent a participant from rejoining, but it requires prior setup and more management of admitting participants. The link below shows the process in more detail. Remove a Participant
Set meeting to use Lobbyhttps://www.youtube.com/watch?v=_jj0XgB-P84 CollaborateBlackboard Collaborate sessions can be configured to not allow attendees to use their mics, cameras, or chat. However, the sessions are limited to the enrolled students by default and therefore attendees can be held accountable. There is a method to invite a guest speaker, but not mass audiences. If your guest link gets into the hand of disruptive participants, you can remove the participants and disable the link using the steps below. If the attendee joined from a course, they are notified about the disconnection and aren't allowed to reconnect. If the session is open ended like the course room, the attendee can rejoin after the moderator has left and rejoined the session. The attendee can join the session again the next time the moderator joins. Turn off Chat, Mics, and CamerasTo turn off chat, mics, and cameras, open the session settings and uncheck Share Audio, Share Video, and Post Chat Messages.
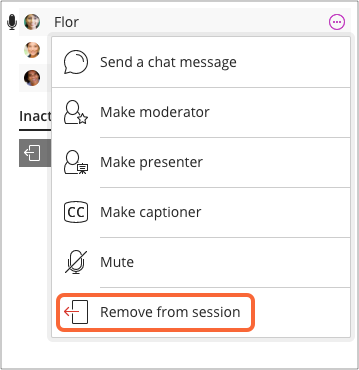
Remove AttendeePoint to an attendee in the Attendees panel and select Attendee controls. Select Remove from session.
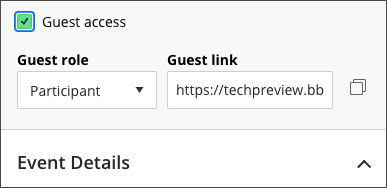
Turn off Guest AccessThis setting is off by default, but if you turned it on and now need to turn it off, follow these steps:
This article was:
Article ID: 642
Last updated: 29 Aug, 2025
Revision: 12
Access:
Public
Views: 550
Also listed in
|
.png)
.png)

Powered by KBPublisher (Knowledge base software)