Eastern Connecticut State University Knowledgebase

Blackboard Quick Start Guide

Article ID: 517
Last updated: 23 Aug, 2023

When you open a course in Blackboard for the first time, it's blank. And the only obvious place to put content is the Content Collection. However, the Content Collection is only a place to put content for you, as the instructor. It does not make that content available to your students. To do that, you have to create a Content Area. Creating a Content Area opens up tools for you to add content directly to the Content Area, where students will have access to it. 

These steps show you how to create a Content Area from a blank course:

  1. Login to Blackboard at https://easternct.blackboard.com using your Eastern username and password. It's important to note that your account has to be active. If you've requested a password reset recently, it won't work in Blackboard until you log into Email or Office 365 and change the password to only something you know. If you don't have an account or need to know more about Accounts at Eastern go to Article 32: Faculty/Staff Technology Accounts (Email, Computers, Blackboard)
  2.  Click on a course from the Course List. The course will be blank.
  3. Make sure the Edit Mode option is set to On at the top right of the main body of the page.
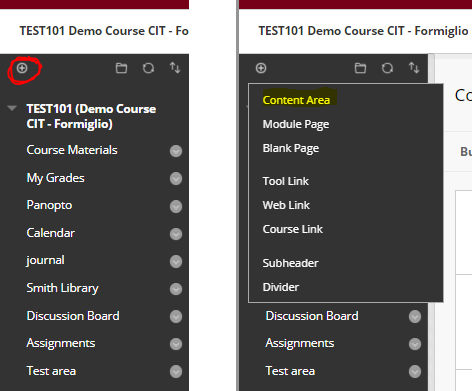
  4. Put your mouse over the plus sign that appears in the upper left hand corner of the Course Menu and select Content Area from the resulting menu. 
    Note: the plus sign may be in the upper left corner OR towards the right, next to the folder icon. 


  5. Type a name in for the Content Area. You can call it Course Materials and put all your content in the one area, using folders within that to organize further.  Check the box to make it available to users. Then click Submit. The Content Area should appear in your Course Menu.
     

  6. Click on the menu item you just created. Menu buttons across the top will appear. These are used to add content to your course.  


  7. Add a file by clicking Build Content. Select File from the available options. But also note the option to create a Content Folder on the Build Content menu. You can create folders to organize files within your Content area.
     

  8. A new window will appear with the option to Browse your computer to upload a file. Fill in all the fields as you deem appropriate and click Submit.
     

  9. The file will appear for students to see.
  10. If you want to create a folder, go to the build menu and choose Content Folder
  11. Give it a name and click Submit
  12. Click on the folder name
  13. Now you can Add Files as described above.
This article was:  
Article ID: 517
Last updated: 23 Aug, 2023
Revision: 9
Access: Public
Views: 3079
Also listed in